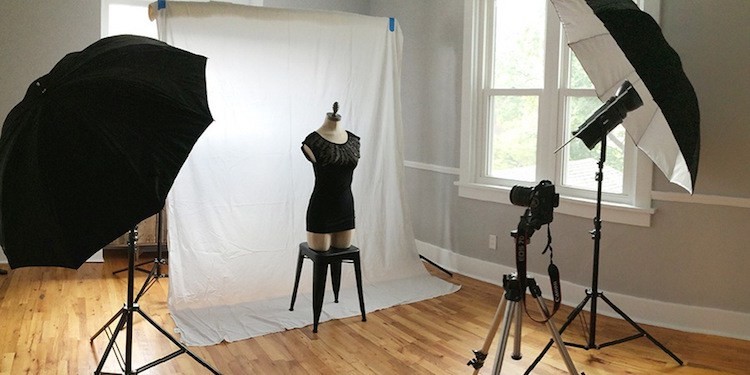
Shaping light is a vital photography skill. I say “shape” for a reason: improving lighting doesn’t simply mean adding more wattage. It means selecting the right equipment and positioning for your product, budget and studio space.
When you’re deciding where to invest your dollars in product photography, first ask yourself two questions: What am I shooting? Where am I shooting?
Your needs will be different if you’re exclusively shooting still products in studio versus apparel on models in motion outdoors. The answers to your “what” and “where” questions will determine whether you need battery packs or AC power, what type of recycling time you need, whether remote triggering is necessary, the importance of portability, and how you handle safety concerns. Keep those specifics in mind as we break down broader divisions.
Let’s explore three different kinds of lighting kits: continuous, speedlight, and strobe monolight.
Continuous Lighting
Continuous lighting works the way it sounds: your light stays on, continuously. It’s most useful for still photography and video, which suits product photography well.

Continuous lighting kits are good for beginners.
Continuous lighting is good for beginners because you can see how light will affect your image before shooting, which makes adjustments easier. It’s also cost-effective compared to other lighting kits.
There are three primary types of continuous lighting bulbs: fluorescent, tungsten and LED. The choice between bulb types is mostly a matter of personal preference, as each has pros and cons.
- Tungsten bulbs emit the most light in the broadest spectrum, but they also emit an uncomfortable or even dangerous amount of heat and use the most power.
- LED bulbs are easy and fast to set up, but because they’re newer there aren’t as many accessories available.
- Fluorescent tends to be the most common bulb in use in studio lighting; they’re safer and more energy efficient than tungsten, they have lots of modifiers like softboxes available, and there’s no need for the portability of LED.
Whatever bulb you select, set your camera’s white balance accordingly and use a grey card to ensure your colors are captured as accurately as possible.
There’s a wide price range when it comes to lighting equipment for product photography. Here are good options for continuous lighting kits at a variety of price points:
- $105 Smith Victor Imagemaker Flourescent Tent Kit
- $110 Flashpoint 2 Light Fluorescent Kit
- $180 Flashpoint 3 Light Fluorescent Kit
- $180 Bescor LED– 95DK2 Light Kit
- $380 Interfit Stellar INT188 Tungsten Double Softbox Kit
- $400Flashpoint 500 LED Video 2-Light Kit
You can give yourself even more control over your light if you look for adjustable power options. Variable power may save you time and help you take better photographs by letting you adjust your light more subtly and quickly than removing bulbs. Some multi-socket kits will let you toggle select bulbs on and off to control your power.

$550 Savage Variable Power 3 Flood Light Kit

$200 StudioPRO 3000W Triple 5 Socket Softbox Kit
Speedlight Lighting
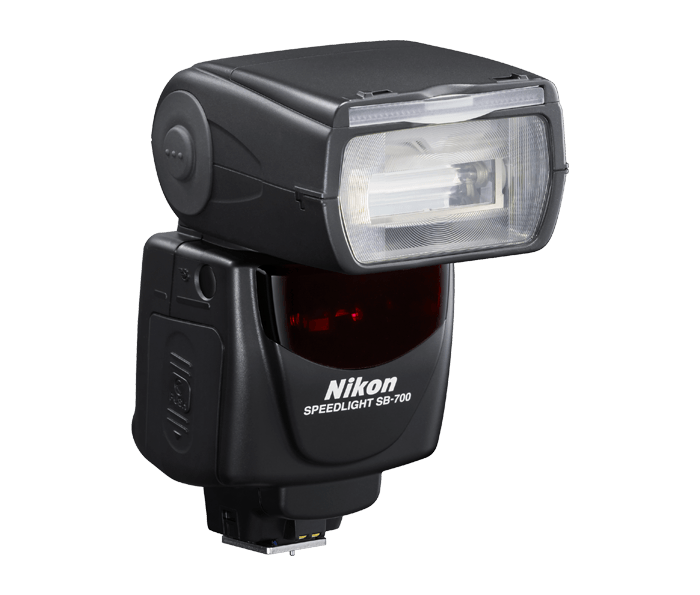
Speedlights (or “speedlite”) are external flash units also known as an “on-camera flash.” Despite the name, they don’t have to be attached to your camera (although they often are).

Speedlights, also known as on-camera flashes, are highly portable and versatile. Img src: nikonusa.com
Speedlights are faster and more powerful than your camera’s built-in flash, and they can be used with umbrellas and softboxes to create dispersed light. They’re lightweight, portable and lend themselves well to action shots and location photography.
If you’re taking the speedlight approach, you’ll need to purchase both a speedlight and an accessories kit. Here are two great speedlight flash options:
- $225 Bolt Flash for Nikon cameras
- $270 Bolt Flash for Canon cameras
You can fire flashes from your camera or remotely, which leads into the next step of assembling your speedlight kit.

You can buy light stands and softboxes without lamps to use with your speedlight.
You need umbrellas, reflectors, and stands to complete your lighting kit. Here are two options at different scales:
- $150 Westcott Speedlite Kit (one softbox, stand, shoe mount)
- $500 Photoflex Speedlite Kit (two softboxes, stands, speed rings, shoe mounts, bag)
If you don’t want to assemble your own kit, there are total packages available like this one:
- $1400 Canon Speedlight Portrait Kit
The above package comes with two flashes, a transmitter, two umbrellas, two shoe mounts, two light stands and a rapid battery charger. Yes, you can sync multiple speedlights to your camera wirelessly.
Monolight Strobe Lighting
Monolights are self-contained strobe units with a power supply, cooling fans, reflectors and stands. They’re sometimes also called “monoblocks.”

Monolights are tidy self-contained units with their own power supply and more.
The primary advantage of a monolight is that the head of the lamp contains its own power source, so you don’t need an additional generator or power pack. It’s tidier, allows more positional flexibility and eliminates extension cables preventing power loss (estimated at about a ¼-stop of light each time you connect cable components).
Monolights are studio favorites, but they can be used for location photography as many of them are quite compact. It’s helpful not to be dependent on a single power pack, so that if one light’s power supply is blown any others will still be operable.
Strobe monolights are popular for model photography and product photography. They also usually come with a continuous lighting setting.
Here are a few good strobe monolight options:
- $450 Westcott 240 Strobelite Two Monolight Kit
- $585 Novatron M150 Two Monolight Kit
- $900 Bowens Gemini Two Monolight Kit
Whatever type of lighting kit you invest in, we recommend getting at least two sources to ensure you have ample light. The added versatility will allow you to be more creative and professional.
Next Steps

Lighting is product specific: you’ll use a different arrangement for metallic objects than you will for apparel.
Once you have your equipment, you need to know how to use it. With lighting, that largely means positioning. Take reflective products as an example: you might backlight clear or colored glass, while you sidelight detailed glass, and overhead light metal objects.
Do you have questions about other equipment like cameras, lenses, light meters,and wireless transmitters? Read the minimalist’s guide to outfitting a professional photography studio for a complete breakdown of product photography components.
Do you have experiences of your own to share? Let us know in the comments below.